

Blog
Blind Installation Methods That Cut 30% Light Leakage: Top Mount vs Side Mount vs Inside Mount

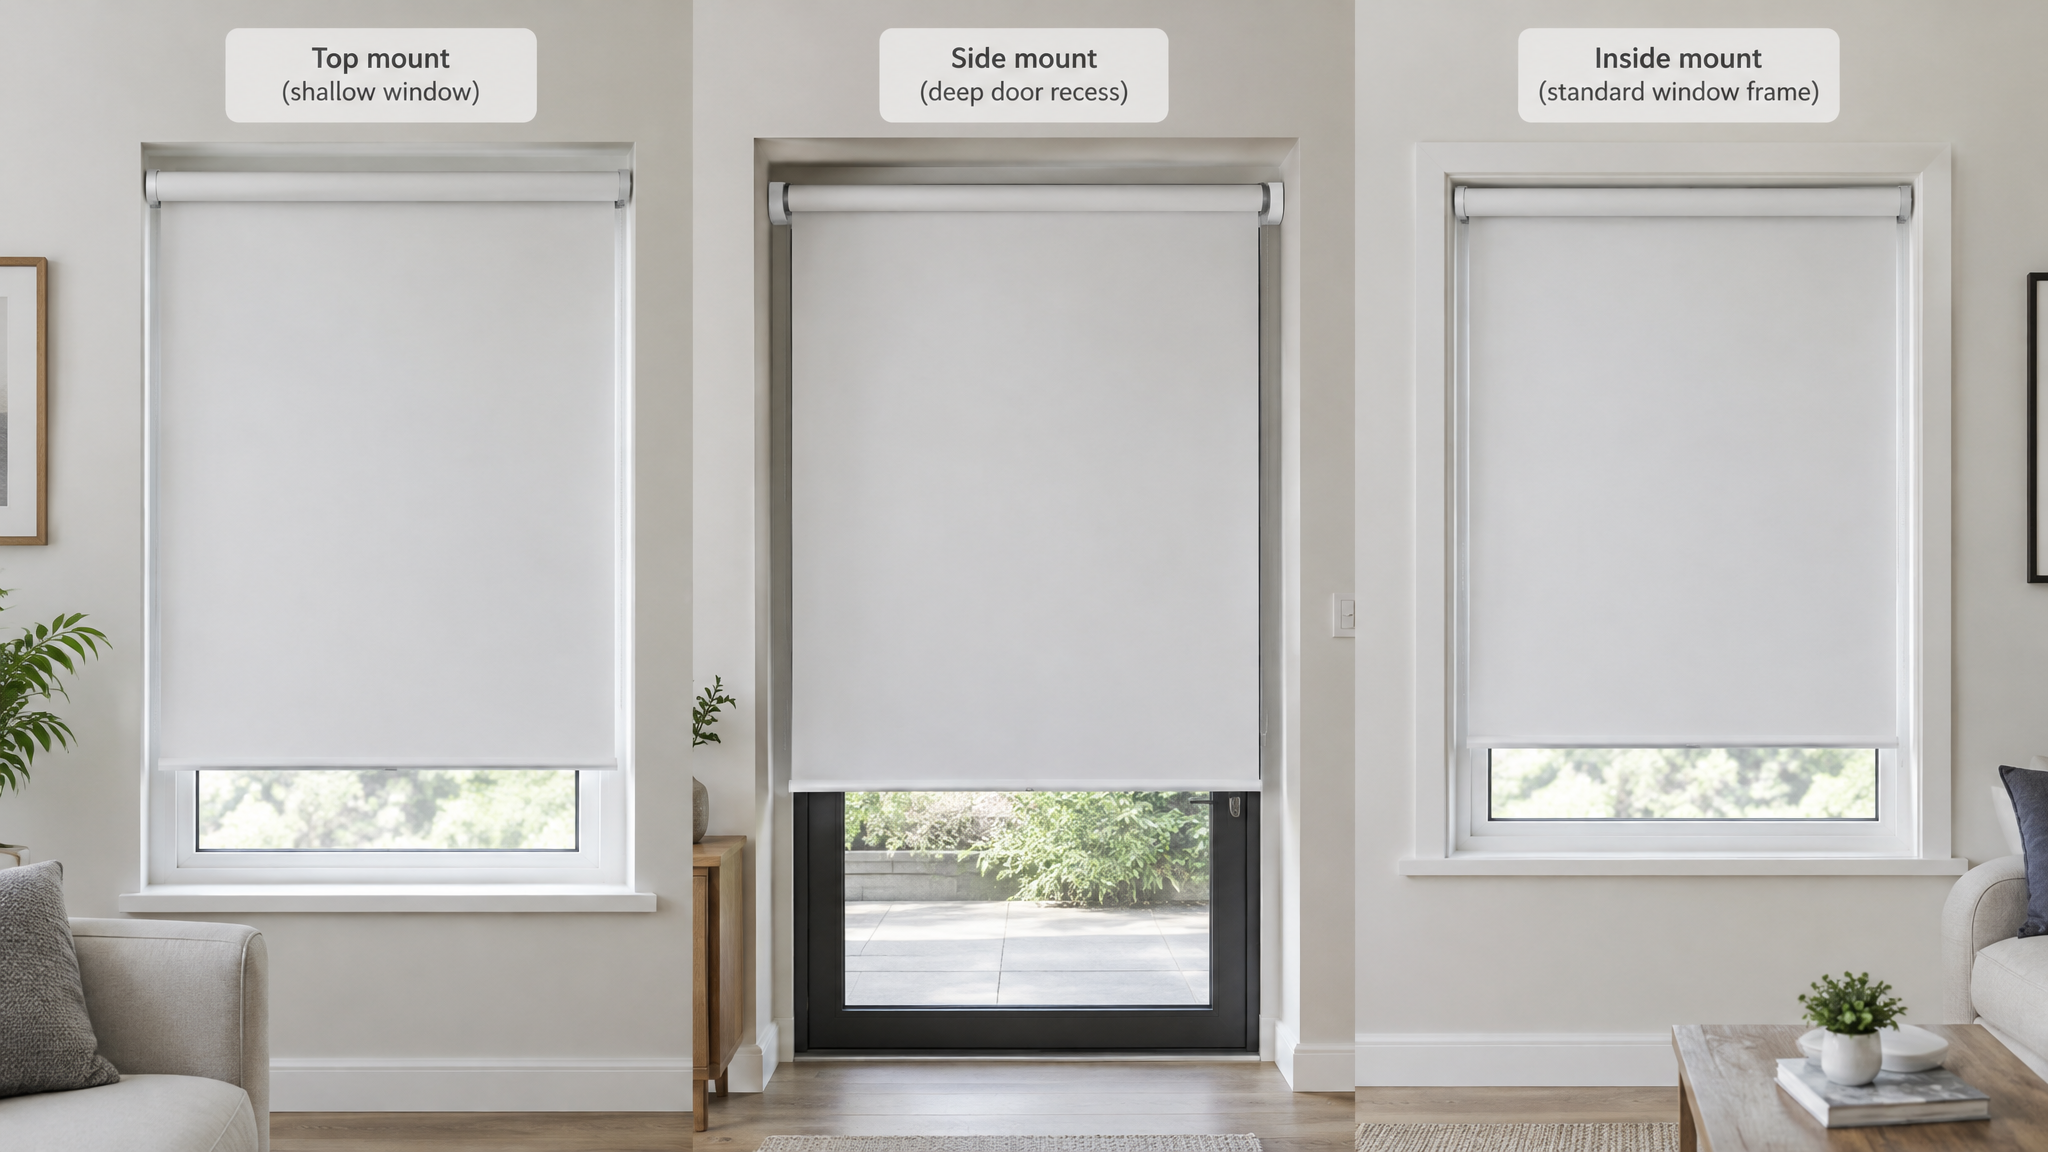
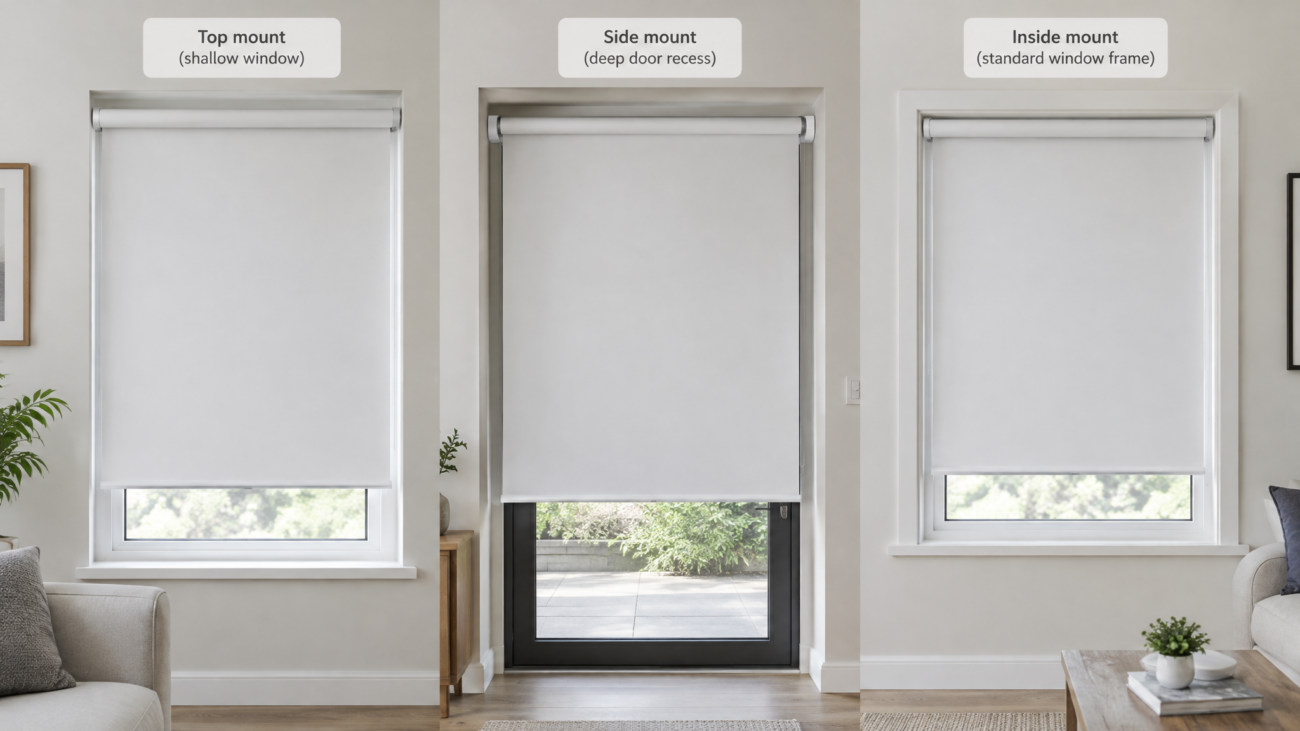
Nearly **30% of blind returns** trace back to one avoidable decision: choosing the wrong **blind installation method** for the window type. Top mount, side mount, and inside mount are not interchangeable. Each changes light leakage, bracket load, and how long the blind lasts. This guide breaks down the three blind installation methods, the window types each fits, and the pre-survey checks that prevent costly rework.
## Why Blind Installation Methods Decide Light Leakage and Long-Term Durability
A blind only performs as well as its brackets. Industry audits show that incorrect mounting orientation accounts for roughly **1 in 4** window covering complaints. The right blind installation method distributes weight across the strongest surface and controls the gap between the fabric and the frame.
### Light Leakage Is a Mounting Problem, Not Just a Sizing Problem
Even a perfectly sized blind leaks light when the bracket pulls the fabric away from the window. Top mount and side mount change projection and gap size. Inside mount relies on recess depth to block perimeter light.
### Rework and Return Costs Hit Margins Fast
For retailers and installers, a mounting mistake typically adds **$45–$90 per window** in labor, patching, and return shipping. That cost compounds on multi-window projects. Reliable manufacturers therefore require a pre-installation survey before confirming the blind installation method.
## Top Mount Blind Installation: Ceiling-Mounted Brackets for Shallow and Specialty Windows
Top mount blind installation attaches brackets to the ceiling, soffit, or top face of the window opening. The blind hangs downward and covers the entire opening from above. It is the go-to choice when the window depth is too shallow for an inside mount or when the side walls are too weak to hold side mount brackets.
### Step-by-Step Top Mount Installation
– Mark bracket positions on the ceiling or top lintel, keeping both brackets at equal distance from the front edge.
– Pre-drill pilot holes and use anchors rated for the substrate. Drywall alone will not hold a heavy blind.
– Attach the mounting brackets and lock the blind headrail into place.
– Check that the blind hangs level and the fabric clears the window trim by at least **1/4 inch**.
### Best Window Types for Top Mount Brackets
– Bay and bow windows with limited depth at the angle joints.
– Windows with shallow drywall returns under **2 inches**.
– Patio and French door installations where the top surface is the only solid anchor.
– Skylights and angled ceilings that require a fixed top anchor.
Top mount installation is not a universal fix. It exposes the headrail and can create a larger light gap at the sides if extension brackets are not included.
## Side Mount Blind Installation: Wall-to-Wall Brackets for Deep Recesses and Doors
Side mount blind installation screws brackets into the side walls or vertical jambs. The blind spans the opening like a curtain. This works well when the top surface is uneven, obstructed, or too soft.
### Step-by-Step Side Mount Installation
– Measure the exact wall-to-wall width at the top, middle, and bottom. Use the smallest width for the blind cut.
– Mark bracket holes on both side walls at the same height.
– Use extension brackets or spacer blocks when the blind must clear a protruding handle or alarm sensor.
– Fasten the brackets, mount the headrail, and test the full raise/lower cycle before final tightening.
### When Side Mount Outperforms Inside Mount
– Deep window recesses over **4 inches** where an inside mount would sit too far back.
– French doors, sliding doors, and swing doors with no top frame clearance.
– Uneven or angled walls that make top mount leveling difficult.
– Windows with crank operators or large handles that block an inside mount path.
Side mount blind installation works best with a complete hardware kit that includes longer screws and extension brackets. Missing spacers often force installers to improvise, which leads to sagging brackets and callbacks.
## Inside Mount Blind Installation: The Clean Recessed Fit for Standard Frames
Inside mount blind installation fits the blind inside the window frame recess. The brackets attach to the top corners of the recess or the side jambs. This method creates a clean, built-in look and works well for standard windows with sufficient depth and square openings.
### How to Measure for Inside Mount
– Record the width at the top, middle, and bottom of the recess.
– Record the height on the left, center, and right.
– Use the **smallest width and shortest height** so the blind never rubs or jams.
– Confirm the recess depth meets the manufacturer’s minimum, usually **1 1/2 to 2 1/2 inches** depending on the blind type.
### Common Inside Mount Mistakes
– Measuring only one point and ordering a blind that binds in a tapered recess.
– Ignoring window cranks, sensors, or tile backsplash that reduce usable depth.
– Assuming the frame is square when older homes often have up to **1/2 inch** of variation.
Inside mount offers the best light control because the blind sits inside the recess. But it requires a precise survey and compatible frame dimensions. Otherwise, a side mount or top mount blind installation will perform better.
## Pre-Installation Survey: A 7-Point Checklist to Recommend the Right Blind Installation Method
A pre-installation survey is the difference between a profitable install and a callback. Top mount, side mount, and inside mount each demand different data. Reliable suppliers and installers use this checklist before cutting or drilling anything.
### What to Measure Before Drilling
1. **Recess depth** — confirms whether inside mount is possible.
2. **Frame width and height variance** — detects tapered or out-of-square openings.
3. **Surface material** — drywall, concrete, steel, or wood changes anchor selection.
4. **Obstructions** — handles, cranks, sensors, and moldings that limit clearance.
5. **Mounting surface availability** — top, side, or both.
6. **Window orientation and light exposure** — affects gap tolerance and bracket projection.
7. **Blind weight and width** — determines bracket count and anchor rating.
### How to Use the Survey to Choose Top Mount, Side Mount, or Inside Mount
– Choose **inside mount** when recess depth meets the minimum, the frame is square, and there are no deep obstructions.
– Choose **top mount** when depth is too shallow or the ceiling/soffit provides the only solid anchor.
– Choose **side mount** when the recess is deep, the top is uneven, or the window has protruding hardware.
A documented survey also protects retailers from chargebacks. When a customer claims the blind was mis-sized, the survey shows which blind installation method was approved and why.
## Complete Mounting Hardware Kits: What Reliable Suppliers Include
Missing hardware turns a 20-minute blind installation into a **90-minute repair call**. Complete mounting kits should be pre-counted and labeled per blind. Industry audits show that hardware-related callbacks drop by **40%** when suppliers pack kits in sealed, per-window bags.
### What Should Be in the Box
– Left and right mounting brackets matched to the selected method.
– Screws, wall anchors, and spacers rated for the actual substrate.
– Extension brackets for side mount and top mount clearance.
– Valance clips and end caps.
– Hold-down brackets for door-mounted blinds.
– A printed installation template or QR code to a step-by-step video.
For B2B buyers, the mounting hardware kit is not a free add-on. It is a risk-management tool. Suppliers that ship mixed bulk hardware create sorting time on site and increase the chance of using the wrong screw. Reliable manufacturers typically pre-assemble kits to match the exact blind width, weight, and blind installation method.
## Costly Mistakes to Avoid When Comparing Top Mount, Side Mount, and Inside Mount
### Mistake 1: Assuming Inside Mount Fits Every Window
Inside mount looks clean, but it fails in shallow or tapered openings. Forcing it causes rubbing, fabric damage, and warranty disputes. Measure depth first.
### Mistake 2: Ignoring Bracket Projection and Light Gaps
Top mount and side mount need extension brackets to clear trim and reduce side light gaps. Without them, blackout blinds leak light at the edges. Specify projection on the order.
### Mistake 3: Skipping the Pre-Survey for Bulk Orders
Bulk window projects often mix window types in the same building. One method rarely fits every unit. To avoid costly chargebacks, request window photos and depth measurements for each room before quoting.
## Conclusion: 3 Key Takeaways for Choosing the Right Blind Mounting Method
1. **Match the method to the window structure, not the look.** Top mount handles shallow or specialty windows, side mount handles deep recesses and doors, and inside mount suits standard square frames.
2. **Survey before you sell or install.** Depth, squareness, obstructions, and substrate decide which blind installation method prevents light leakage and callbacks.
3. **Demand complete mounting hardware.** Pre-counted brackets, anchors, spacers, and templates reduce install time and return risk.
Use this 7-point survey to audit your next window project and confirm the blind installation method before ordering. Need spec sheets and pre-survey templates for your next bulk blind order? Contact our team for the complete mounting kit guide.
—
## 📚 Related Resources
1. How to measure window depth for inside mount blinds → /blog/how-to-measure-for-inside-mount-blinds
2. Complete blind mounting hardware checklist → /blog/blind-mounting-hardware-checklist
3. Top mount vs side mount for French doors → /blog/top-mount-vs-side-mount-french-doors
4. Reduce light gaps in blackout blinds → /blog/reduce-light-gaps-blackout-blinds
—
## ❓ Frequently Asked Questions
**Q:** What is the difference between top mount and side mount blind installation?
**A:** Top mount attaches brackets to the ceiling or top face, while side mount attaches to side walls or jambs. Top mount suits shallow windows; side mount suits deep recesses and doors.
**Q:** Can I use inside mount for every window?
**A:** No. Inside mount requires sufficient recess depth, usually 1 1/2 to 2 1/2 inches, and a square frame. Shallow or tapered windows need top mount or side mount.
**Q:** Which blind installation method minimizes light gaps?
**A:** Inside mount usually minimizes perimeter gaps because the blind sits inside the recess. For outside mounts, use extension brackets and specify projection.
**Q:** What hardware should a complete blind mounting kit include?
**A:** Left and right brackets, screws, wall anchors, spacers, extension brackets, valance clips, hold-down brackets, and an installation template or QR guide.
**Q:** Why do I need a pre-installation survey?
**A:** It confirms recess depth, squareness, obstructions, and surface material. This prevents mis-cuts, callbacks, and chargebacks